 Welcome to WAPTO!
Overview
The **Roles & Permissions** module implements a robust **Role-Based Access Control (RBAC)** architecture designed to secure your Wapto instance while enabling seamless team collaboration. This module empowers administrators to define granular access levels, ensuring that staff members only interact with the tools and data necessary for their specific functions.
By leveraging RBAC, organizations can significantly reduce the risk of unauthorized data exposure and accidental configuration changes, providing a centralized platform for operational governance and security compliance.
Default roles (Admin, User, agent) are protected system entities. While you can view their configuration, they cannot be deleted to ensure platform stability and baseline access. Permissions are not assigned directly to agents—they are managed through teams.
Key Features
- Granular RBAC Architecture: Define access at the module level (e.g., Agents, AI Models, Campaigns) with precise action controls.
- System & Custom Roles: Utilize protected system roles (Admin, User) or build custom roles tailored to your unique team structure.
- Real-time Permission Inheritance: Users assigned to a role immediately inherit its capabilities, simplifying the provisioning process.
- Invisibility Governance: Restrict entire modules from the sidebar for unauthorized users, maintaining a clean and focused staff interface.
- Centralized Toggle: Quickly activate or deactivate roles to manage staff availability without deleting established configurations.
Navigation Flow
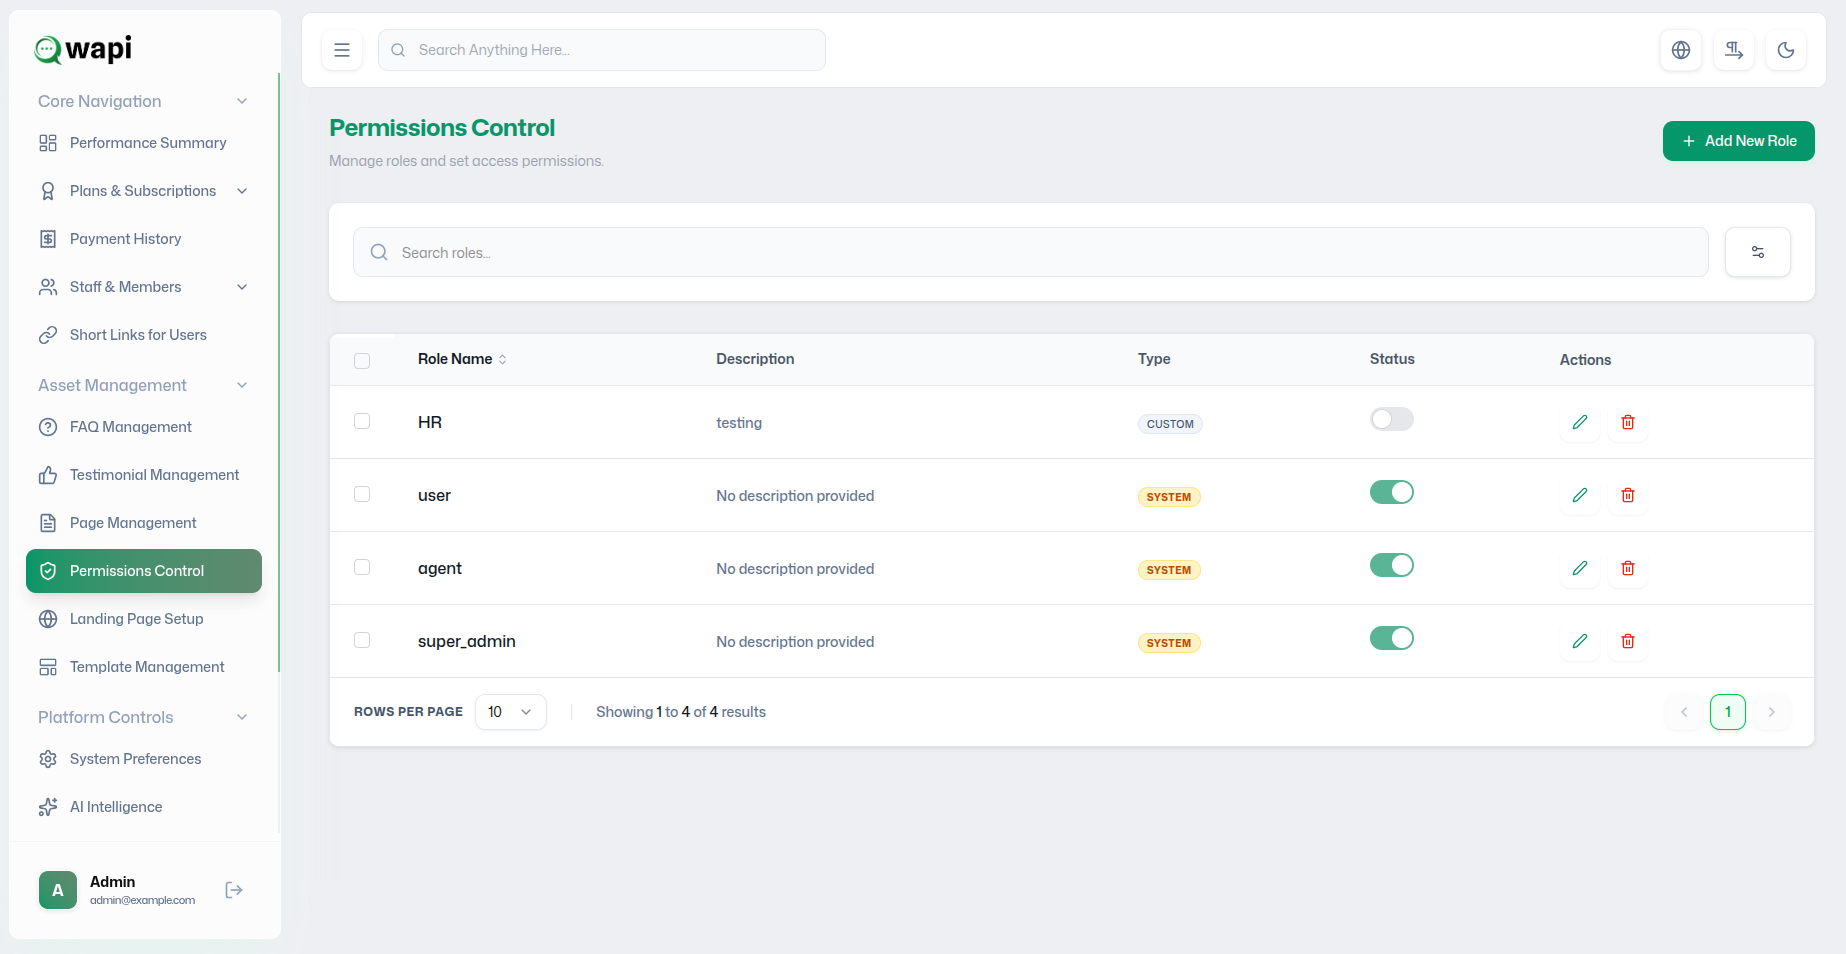
Roles List Overview
The Roles List provides a comprehensive summary of all established access tiers:
- Role Name & Description: Displays the functional title and a brief summary of the role's scope.
- Role Type: Identifies if the role is a protected **SYSTEM** entity or a **CUSTOM** administrative creation.
- Status Toggle: Visual indicators for active deployment vs. internal deactivation.
- Search Bar: Real-time keyword filtering to locate specific roles within the inventory.
- Action Protocols: Direct entry points for **Editing** permissions or **Deleting** custom roles.
How to Create a New Role
Step 1: Initiation
Step 2: General Information
| Field | Functional Requirement | Required |
|---|---|---|
| Role Display Name | A precise functional name for the role (e.g., "Support Manager"). | Yes |
| Description | A brief explanation of what this role can do within the platform. | Optional |
| Active Status | Toggle ON to make the role immediately available for user assignment. | Optional |
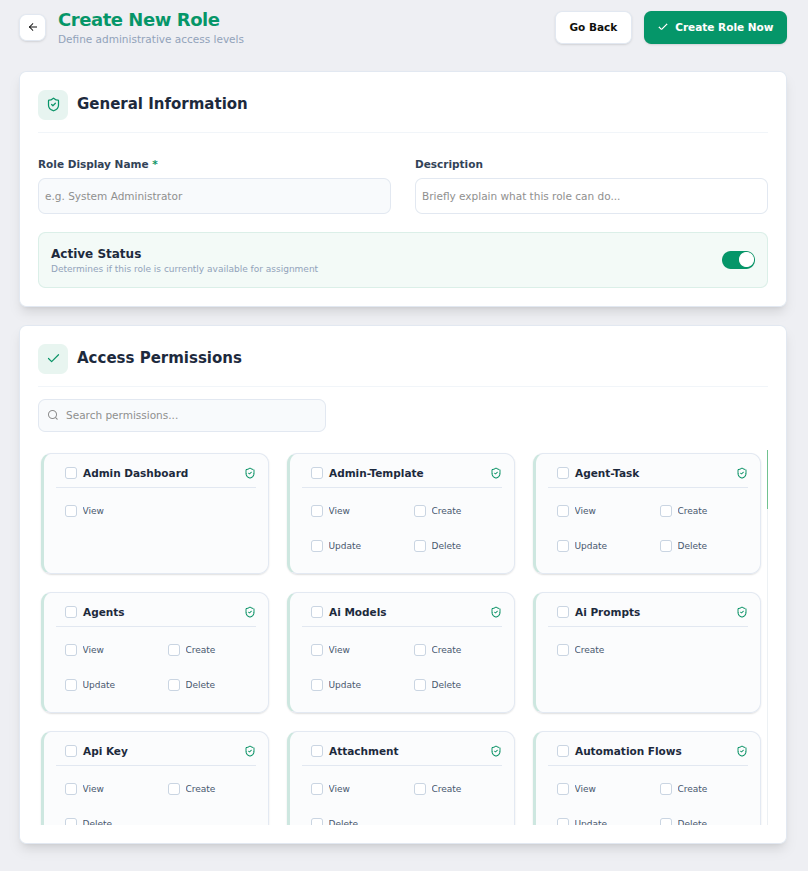
Step 3: Access Permissions Configuration
Permissions are organized by module (Agents, AI Models, AI Prompts, etc.). For every module, you can assign the following actions:
- View: Grants visibility to the module and its data list.
- Create: Permits the provisioning of new records within the module.
- Update: Allows modification of existing records.
- Delete: Enables the permanent removal of records.
Step 4: Role Provisioning
Managing Established Roles
Dynamically update a role's capabilities. Assigned users inherit changes instantly upon their next interaction.
Deactivate roles to prevent new assignments while keeping historical permission mapping intact.
Apply roles via the **Manage Users** module during provisioning or profile editing.
Workflow Example: Provisioning a Support Tier
Security Best Practices
- Least Privilege: Only grant the minimum level of access required for a staff member's function.
- System Role Protection: Avoid using the Super Admin role for daily operational tasks.
- Regular Audits: Review role permissions every quarter to ensure operational alignment.
- Naming Precision: Use clear, descriptive names to avoid confusion during assignment.